Triangle Choke Technique: Fix the Angle Before You Squeeze
Build a safer, tighter triangle by controlling posture, trapping one arm, turning the hips and aligning the leg lock before adding finishing pressure.
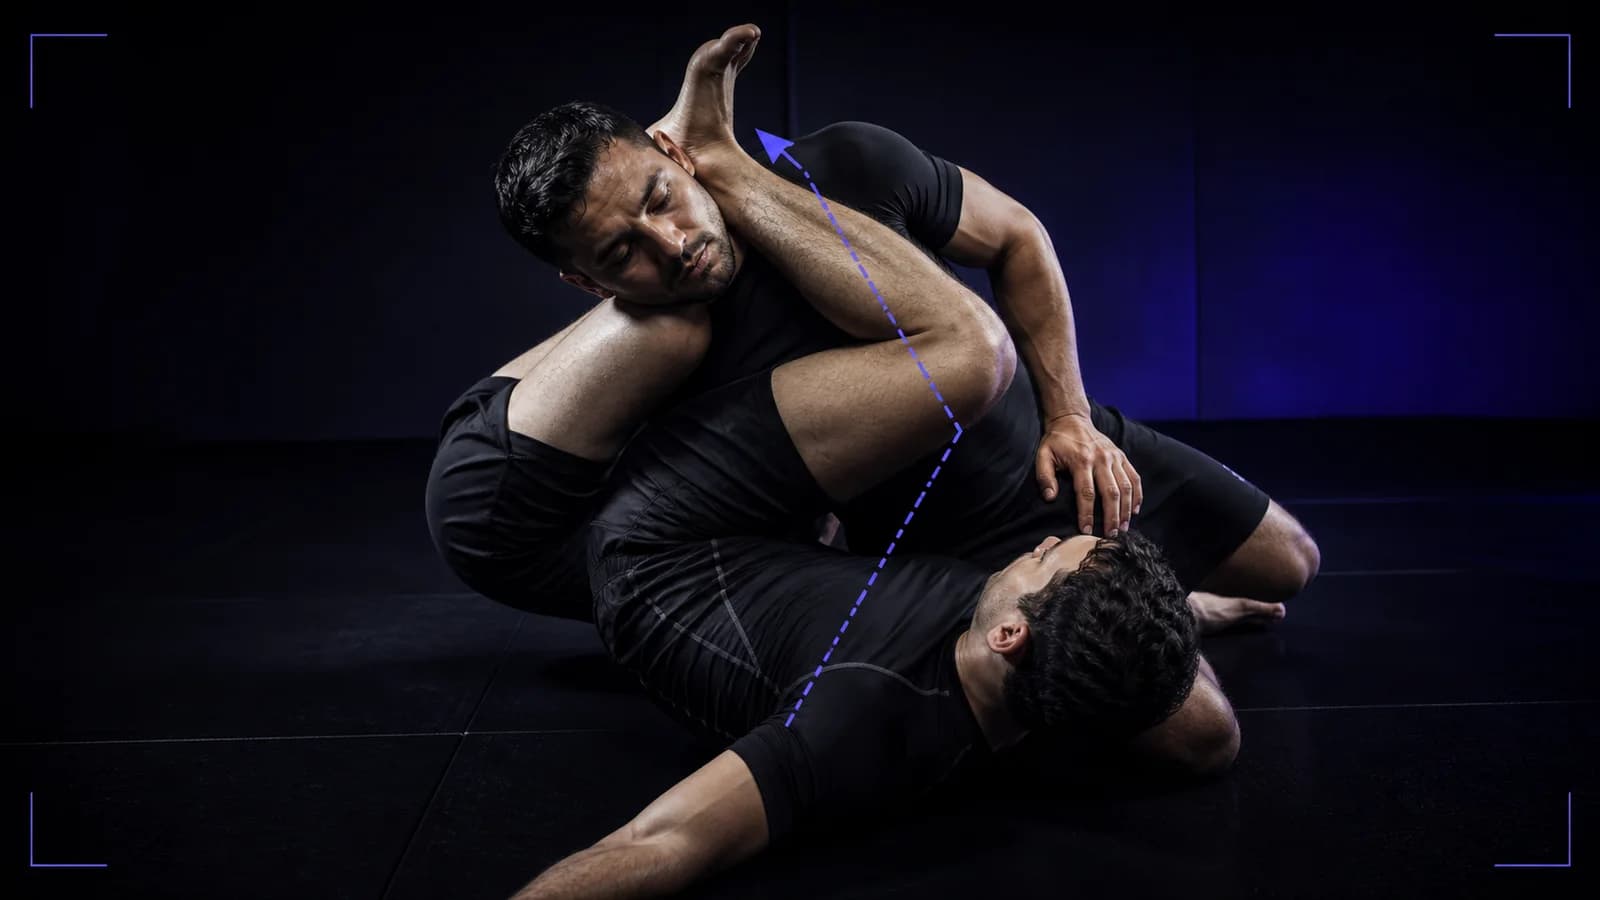
A triangle choke becomes mechanically cleaner when you control posture, keep the opponent's head and one arm inside the leg frame, turn your hips off center and close the knee line around the neck and shoulder before you add pressure. If you remain square and pull with the feet, you often create space instead of removing it.
This is a strangle. Practise only with a qualified grappling coach, a cooperative partner and a clear tap protocol. Release immediately when your partner taps or signals distress. Never test a choke on an untrained person or continue after loss of responsiveness.
Build the position before the finish
From guard or another coached entry, isolate one arm inside and one arm outside. Control posture so the opponent cannot simply lift the head and shoulders away. Bring one leg across the back of the neck while the other leg helps you manage distance and angle.
The International Judo Federation's sankaku-jime reference describes the triangle formation around the neck and one arm. BJJ grips, entries and rules vary, so follow your coach and current ruleset.
Put the knee line in the right place
The choking leg should cross the back of the neck rather than sit low across the shoulder blades. If the opponent's trapped shoulder remains outside the frame or the knee slips away from the neck, squeezing harder may not close the space.
Use your grips to maintain posture control while you adjust. Do not pull the toes or crank the foot to force the lock.
Turn the hips off center
Angle your body toward the side of the trapped arm. That turn lets the back of your knee come closer to the opponent's neck and helps your other leg close over the ankle or shin in the lock your coach teaches.
A square position asks the legs to compress a wider shape. The angle narrows the frame before you squeeze.
Use the floor, a safe grip on the shin and coached hip movement to create the angle. Do not yank the head or twist your partner's neck to compensate for poor alignment.
Close the leg configuration carefully
Bring the locking leg over the ankle or lower shin as your system teaches, then flex and position the legs without pulling on the foot. Keep the opponent's head and trapped arm in the frame.
If your legs do not close comfortably, keep drilling the angle and posture control instead of forcing a figure-four around a shape that remains too wide. Body proportions change which details fit.
Finish gradually and release early
Once the position is aligned, draw the knees together and use controlled hip and leg pressure as your coach directs. Add pressure slowly enough that your partner can tap. The instant the tap arrives, open the legs and remove pressure.
Agree on hand taps, foot taps and a spoken signal before the round. The person applying the choke owns the responsibility to release, even when the tap feels ambiguous.
Fix the common failures
| What happens | Review first |
|---|---|
| Opponent keeps posture | Head and upper-body control before the leg lock |
| Lock closes over the foot | Hip angle and safe leg configuration |
| Large gap beside the neck | Choking-leg knee line |
| You squeeze for a long time | Stop, release and rebuild position; do not increase force |
| Opponent stacks you | Entry timing, posture control and your coach's safe response |
Do not diagnose the missing detail from one freeze-frame. The entry, grips and partner response matter.
Drill without turning every rep into a finish
Use positional rounds where the attacker earns posture control and angle, then resets before adding pressure. Another round can start from the aligned position and practise only the partner's tap and immediate release.
Keep resistance low until both people understand the sequence. Stop when fatigue makes the tap, neck position or bodyweight control less reliable.
Review the angle in Grappling AI
Place the phone outside the mat at a low front-oblique angle that shows both athletes, the trapped arm, hip angle and leg lock. Ask everyone in frame for permission and keep the device out of the rolling area.
Open Grappling AI with your own drill clip. Compare posture control, one-arm-in positioning, hip angle and the final leg configuration. Use the video feedback to choose one positional drill for the next session, then confirm it with your coach. Grappling AI cannot feel pressure, confirm blood flow, judge consciousness or replace the partner's tap.
Your next technical round
Start from a cooperative triangle setup. Pause after posture control, after the angle change and after the leg lock. Let your coach inspect each phase. Add only light finishing pressure, receive the tap and release immediately.
The finish should come from a better shape, not a longer squeeze.
Primary source
Try these free tools
Train Grappling with AI
Get Grappling AI on Android. It reviews your technique, helps plan your training and tracks your nutrition.