Deadlift Form: Setup, Bar Path, and Lockout Guide
Learn proper deadlift form from setup through lockout, fix common bar-path mistakes, and use a filmed set to choose your next correction.
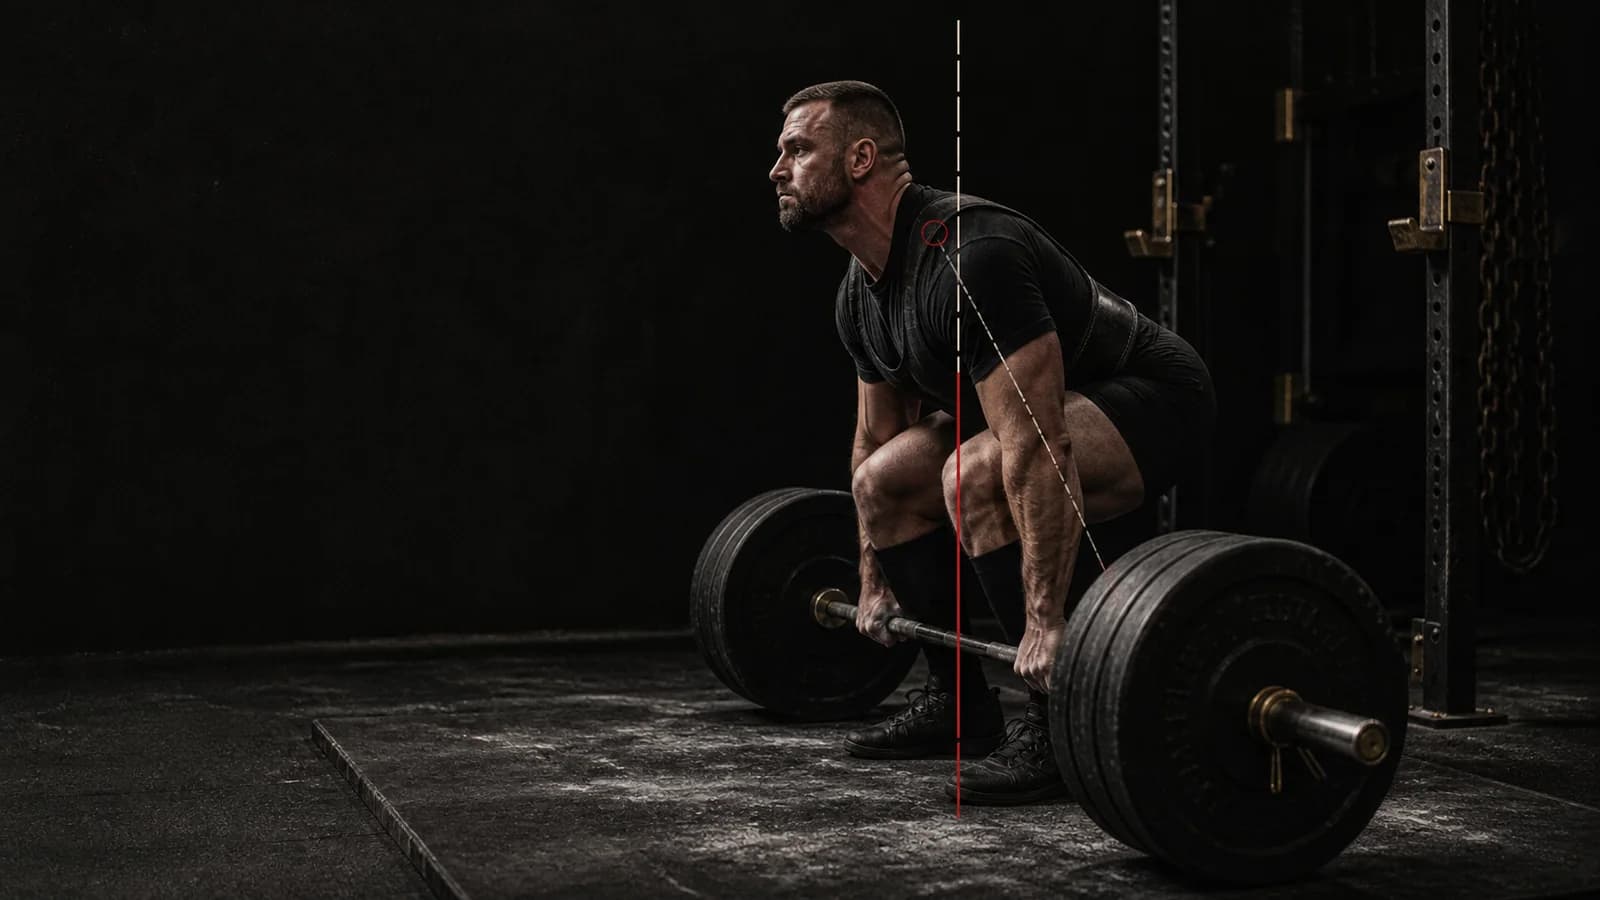
Good deadlift form starts with the bar over your midfoot, a braced neutral spine, and a bar that stays close as you stand. Push the floor away, let your hips and shoulders rise together, then finish tall without leaning back. If you compete in the IPF, the lift is complete only when you stand erect with your knees locked and your shoulders back; wait for the down command before lowering the bar. IPF's technical rules define that standard.
Film a moderate top set from the side before you change five things at once. Look for one visible break in the sequence, choose one cue, then film the next set. That turns “my deadlift feels off” into a correction you can actually test.
For related strength work, use the strength hub, compare your conventional setup with the sumo deadlift guide, and keep your training numbers honest with this guide to squat 1RM checks.
The deadlift setup: make the start repeatable
Your setup does not need to look identical to another lifter’s. Arm length, torso length, mobility, and whether you pull conventional or sumo change the picture. The repeatable pieces matter more:
- Stand with the bar over the middle of your foot. A useful conventional reference from ExRx places the bar over the midfoot, with shoulders slightly in front of it at the start.
- Hinge down and take your grip without rolling the bar away from that position.
- Bring your shins to the bar, then set your upper back before you pull.
- Brace your trunk and create tension through your arms and lats so the bar starts close to you.
- Push the floor away until the bar passes your knees; then stand tall to finish.
The CrossFit deadlift movement standard describes the same useful order: bar in contact with the body, shoulders above hips, hips above knees, a neutral braced spine, and hips and shoulders rising together. Those are coaching references, not a demand that every lifter copies one exact hip height.
Find your own start position
Set the bar over midfoot first. From there, take the slack out and let your body settle into a position where your arms are straight, your shoulders sit slightly in front of the bar, and you can keep your balance over the whole foot. If you force your hips very low, your knees may push the bar forward. If you start very high, you may turn the first part of the lift into a stiff-legged pull. Film the setup, not only the lockout, because most bar-path problems begin before the plates leave the floor.
Competition standards and coaching cues are not the same thing
If you lift in a meet, use the rulebook to decide whether a rep passes. Use coaching cues to improve how you get there.
| Situation | Competition standard | Useful coaching cue |
|---|---|---|
| Start | The bar begins motionless on the platform. | "Set the bar over midfoot, then pull the slack out." |
| First pull | The bar must move upward without a downward movement before the final position. | "Push the floor away; keep the bar close." |
| Finish | In IPF competition, stand erect with knees locked and shoulders back. | "Stand tall; do not chase the finish by leaning back." |
| Lowering | Lower only after the referee's down signal. | "Own the top position for a beat." |
IPF technical rules also list supporting the bar on the thighs, failing to lock the knees, and failing to stand erect with shoulders back as causes for disqualification. That is useful for meet practice. It does not mean a gym rep needs to look theatrical. Your goal is a stable, repeatable finish that you can reproduce under the rules that govern your meet.
Keep the bar close from the floor to the lockout
The bar should travel up close to your body. A bar that drifts forward increases the distance between the load and you, then asks you to recover that distance later in the pull. The NSCA's deadlift coaching article recommends engaging your lats before the pull to help keep the bar close to the legs.
Think of the pull in three checkpoints:
- Floor to knee: Push through the floor while your hips and shoulders rise together. The bar stays close; it does not swing around your knees.
- Knee to mid-thigh: Keep the bar in contact or very close as your knees clear. Do not turn this into a shrug or yank.
- Lockout: Finish by standing tall with the knees locked. Bring the shoulders back into the completed position, but do not throw your ribs up and lean behind the bar.
The cue "keep the bar close" is not a license to scrape yourself. It is a way to organize the pull. If you cannot keep the bar close without changing your balance, reset the start position rather than dragging the bar back mid-rep.
Four deadlift form mistakes and the next correction
1. Your hips shoot up before the bar moves
When the hips rise while the bar stays on the floor, your starting position has changed before the actual pull begins. On the next set, reduce the load enough to practice one clean start. Brace, take tension out of the bar, then think: push the floor away. Review whether the hips and shoulders leave together rather than chasing a perfectly vertical back angle.
2. The bar drifts away from your legs
This usually appears from the side as a small arc forward from the floor or around the knees. On the next set, set the bar over midfoot and engage your lats before you break the floor. The NSCA cue is simple: create tension in the lats so the bar stays close. Film again from the same angle before you decide the cue worked.
3. You pull with your shoulders before your legs
If your shoulders rise quickly while your hips stay back, you may be trying to yank the weight off the floor instead of using the whole setup. Use a lighter rep and let the bar become tense before it moves. Then push through the floor while you keep your arms long. Your arms connect you to the bar; they do not need to turn the first pull into a row.
4. You lean back to finish
A finish is not a backbend. In an IPF lift, you need to stand erect with knees locked and shoulders back. Once you have that position, stop. On video, look for the moment the knees lock and the bar settles over the middle of the foot. If you keep moving after that, practice a quiet, motionless finish before you add weight.
Use a filmed set to choose one correction
Film one work set from the side at a load you can control. You are not trying to make a highlight reel. You are gathering enough information to decide what to practice next.
Self-filming checklist
- Put your phone on a stable support at about hip height, far enough away to keep your feet, plates, and lockout in frame.
- Use a side view that shows the bar, your midfoot, hips, shoulders, and knees throughout the rep.
- Record one to three controlled reps at the same load. Do not change shoes, stance, or camera angle halfway through the comparison.
- Pause at the start, just below the knee, and at lockout. Ask: did the bar stay close, did my hips and shoulders rise together, and did I finish in a stable position?
- Pick one issue only. Your next set might be a lighter setup practice, a cue to keep the lats tight, or a quieter lockout. Film that set from the same angle.
This is a feedback loop, not a self-diagnosis. If something feels wrong or you are dealing with pain, pause heavy lifting and talk with an appropriately qualified professional. A form checklist cannot assess an injury or replace in-person coaching.
Get a second look on your deadlift form
If you want more than your own replay, Powerlifting AI: Gym Coach analyzes training video and displays an overall score with technique feedback. Use that feedback as a second look on the rep, not as a replacement for a qualified coach or a referee.
The practical workflow is simple: film a set, identify the first visible break in your setup, bar path, or finish, then repeat one deliberate correction. That is more useful than collecting ten cues and hoping one sticks.
Frequently asked questions
What is proper deadlift form?
Proper deadlift form puts the bar over the midfoot, keeps your trunk braced with a neutral spine, keeps the bar close as you stand, and ends in a stable upright position. In IPF competition, the finish also requires locked knees and shoulders back before the down command.
Should the bar touch my shins when I deadlift?
For a conventional pull, bring your shins to the bar after you set it over midfoot, then keep the bar close as you lift. The important point is control and balance, not forcing a particular amount of contact or scraping your shins.
Should I look up when I deadlift?
Choose a head and neck position that lets you keep your whole spine braced and your balance steady. Instead of chasing one gaze cue, review your side video for whether the setup and bar path stay controlled from the floor to lockout.
How do I know whether my deadlift would pass in a meet?
Check the technical rules for the federation running your meet. For IPF competition, review whether you reached an erect position with knees locked and shoulders back, avoided a downward movement before completion, and waited for the down signal. Have a qualified coach or meet official help when you need a competition-specific call.
Train Powerlifting with AI
Get Powerlifting AI on Android. It reviews your technique, helps plan your training and tracks your nutrition.